
티스토리 뷰
책으로 공부하는 중인데, h2 database가 아닌 postgresql을 사용하고 싶었는데 생각보다 정확한 가이드가 없어서 조금 고생했습니다.
일단 저는 Intellij에서 Gradle 프로젝트를 springboot로 변경하는 방식을 사용하여 프로젝트를 구성했습니다. Gradle 프로젝트를 springboot로 변경하는 방법은 책에 나와있기 때문에 생략하겠습니다. (스프링 부트와 AWS로 혼자 구현하는 웹 서비스)
중간중간 에러를 정리하여 글이 난잡한데, 순서는 아래와 같습니다.
1. Postgresql 설치 -> 구동
2. bundle.gradle 설정
3. application.properties 설정
4. postgrsesql tool 활용
Postgresql 설치
[ERROR] Windows10 Postgresql 설치오류
Windows 10에서만 발생하는 문제인지는 잘 모르겠으나, 제가 Windows10을 사용하고 있어 이렇게 표시해보았습니다. Postgresql의 DB를 만들기 위해 설치 중에 다른 컴퓨터에서는 잘 설치가 되는데, 제 컴
blue-mina.tistory.com
설치는 위의 게시글에 올려둔 URL을 타고 들어가서 설치했습니다. 저는 설치한지 오래되어서 비밀번호가 기억나지 않아 다시 설치했습니다.. 그런데 비밀번호 변경하는 방법이 있었으니 이 블로그를 참고하면 될 것 같습니다.

설치하고 나면 시작 메뉴에서 위와 같은 프로그램들을 확인할 수 있습니다. 먼저, SQL Shell (psql)을 동작시켜줍니다.

설치한 후에는 SQL Shell (psql)을 눌러 비밀번호만 입력하면 postgres=#으로 쿼리를 입력할 수 있게 됩니다. 만약에 postgresql을 설치했는데, 연결이 안된다는 에러가 나타날경우에는 아래와 같은 방법을 시도해볼 수 있습니다.
postgresql 구동에러
org.postgresql.util.PSQLException: Connection to localhost:5432 refused. Check that the hostname and port are correct and that the postmaster is accepting TCP/IP connections.
    at org.postgresql.core.v3.ConnectionFactoryImpl.openConnectionImpl(ConnectionFactoryImpl.java:280) ~[postgresql-42.2.8.jar:42.2.8]
    at org.postgresql.core.ConnectionFactory.openConnection(ConnectionFactory.java:49) ~[postgresql-42.2.8.jar:42.2.8]
    at org.postgresql.jdbc.PgConnection.<init>(PgConnection.java:195) ~[postgresql-42.2.8.jar:42.2.8]
    at org.postgresql.Driver.makeConnection(Driver.java:458) ~[postgresql-42.2.8.jar:42.2.8]
    at org.postgresql.Driver.connect(Driver.java:260) ~[postgresql-42.2.8.jar:42.2.8]
psql: 서버에 연결할 수 없음: Connection refused (0x0000274D/10061)
"localhost" (::1) 호스트에 서버가 가동 중인지,
5432 포트로 TCP/IP 연결이 가능한지 살펴보십시오.
서버에 연결할 수 없음: Connection refused (0x0000274D/10061)
"localhost" (127.0.0.1) 호스트에 서버가 가동 중인지,
5432 포트로 TCP/IP 연결이 가능한지 살펴보십시오.이 경우에는 현재 postgresql 포트가 열려있지 않은 경우입니다. 실제로도 netstat -ano | grep "5432" 를 할 경우에 아무것도 잡히지 않음을 확인할 수 있습니다.

이때는 제어판>시스템 및 보안>시스템>관리도구>서비스에서 postgresql을 찾아 시작시켜주면 됩니다.


그러면 위와 같이 localhost:5432가 열리게 되며, shell이나 pgAdmin, springboot 서버 구동에서 해당 에러는 발생하지 않게 됩니다.
Springboot 내 postgresql 설치
bundle.gradle에 아래와 같이 dependencies를 추가해줍니다.
dependencies {
    compile('org.springframework.boot:spring-boot-starter-web')
    compile('org.springframework.boot:spring-boot-starter-data-jpa')
    compile('org.springframework.boot:spring-boot-starter-jdbc')
    compile('org.springframework.data:spring-data-jdbc')
    compile('org.projectlombok:lombok')
    compile('org.postgresql:postgresql')

    testCompile('org.springframework.boot:spring-boot-starter-test')
}
저는 책에서 compile('...')의 buildr 방식을 사용하고 있어서 이와 동일하게 dependency를 구성했습니다. 특정 버전이나 gradle 방식의 dependency를 추가하고 싶을 경우에는 maven repository를 참고하여 구성할 수 있습니다.
저는 compile, testCompile 등에 대해서는 잘 몰라서 일단 compile로 설정했습니다.
application.properties에는 아래와 같이 설정해줍니다. 여기까지 하면 프로젝트는 구동이 완료됩니다!
spring.jpa.show_sql=true
spring.datasource.username=postgres
spring.datasource.password=password
spring.datasource.url=jdbc:postgresql://localhost:5432/postgres
spring.datasource.sql-script-encoding=utf-8
spring.main.allow-bean-definition-overriding=true

spring.jpa.properties.hibernate.temp.use_jdbc_metadata_defaults = false
spring.jpa.properties.hibernate.id.new_generator_mappings = false
spring.jpa.properties.hibernate.format_sql = true
logging.level.org.hibernate.SQL=DEBUG
logging.level.org.hibernate.type.descriptor.sql.BasicBinder=TRACE
spring.jpa.hibernate.ddl-auto=create
application.properties 설정 오류
application.properties에 설정이 잘못되어 있을 경우에 발생할 수 있는 에러들을 정리합니다. 모두다 하나씩 겪은 에러들입니다..😥
1. DB setting
if the message is not readable, please check database logs and/or host, port, dbname, user, password, pg_hba.conf)DB에 대한 정보가 틀렸을 수 있습니다. 저는 password를 변경하여 해결했습니다. shell로 DB 정보를 확인한 뒤 세팅하는 것이 좋습니다.
2. null error
java.lang.reflect.InvocationTargetException: nullspring.jpa.properties.hibernate.temp.use_jdbc_metadata_defaults = false 설정으로 해결할 수 있습니다. 이는 버그와 관련된 것으로 자세한 정보는 stack overflow에서 확인하실 수 있습니다.
3. NO relation
org.postgresql.util.PSQLException: 오류: "posts" 이름의 릴레이션(relation)이 없습니다

// Server Error Message
There was an unexpected error (type=Internal Server Error, status=500).
could not extract ResultSet; SQL [n/a]; nested exception is org.hibernate.exception.SQLGrammarException: could not extract ResultSet
relation이 없다는 오류가 나타나는데, 이는 서버가 구동할 때 설정한 entity를 create 해주지 않기 때문입니다.

직접 table 목록을 확인해봐도 Posts가 없는 것을 확인할 수 있습니다. 이는 아래의 설정으로 해결할 수 있습니다.
spring.jpa.properties.hibernate.id.new_generator_mappings = false
spring.jpa.properties.hibernate.format_sql = true
logging.level.org.hibernate.SQL=DEBUG
logging.level.org.hibernate.type.descriptor.sql.BasicBinder=TRACE
spring.jpa.hibernate.ddl-auto=create
Postgresql 활용
h2 database를 사용할 경우에는 http://localhost:8080/h2-console을 통해서 database를 한눈에 확인하고 조작할 수 있었습니다. 물론 postgresql도 shell로 가능하지만 한눈에 확인하기에는 불편한데, 이때 다른 툴을 사용하여 h2-console처럼 사용할 수 있습니다.
pgAdmin

하나의 방법으로는 pgAdmin을 활용할 수 있습니다. pgAdmin으로는 여러가지 모니터링 등 다양한 기능을 제공합니다. 이는 postgresql을 설치할 때 함께 설치되어 있으며, Servers를 더블 클릭하고 DB에 로그인하여 확인할 수 있습니다.
하지만 저는 이는 익숙하지 않고 불편하여 DBeaver를 소개하고자 합니다.
DBeaver
Download | DBeaver Community
Download Tested and verified for MS Windows, Linux and Mac OS X. Install: Windows installer – run installer executable. It will automatically upgrade version (if needed). MacOS DMG – just run it and drag-n-drop DBeaver into Applications. Debian package
dbeaver.io
DBeaver는 위 url을 통해 간편하게 설치하실 수 있으며, DB 연결 및 조작 또한 간편합니다. 모니터링이 아닌 개발 및 데이터 조작/운영을 하기에 좋은 툴 같습니다.
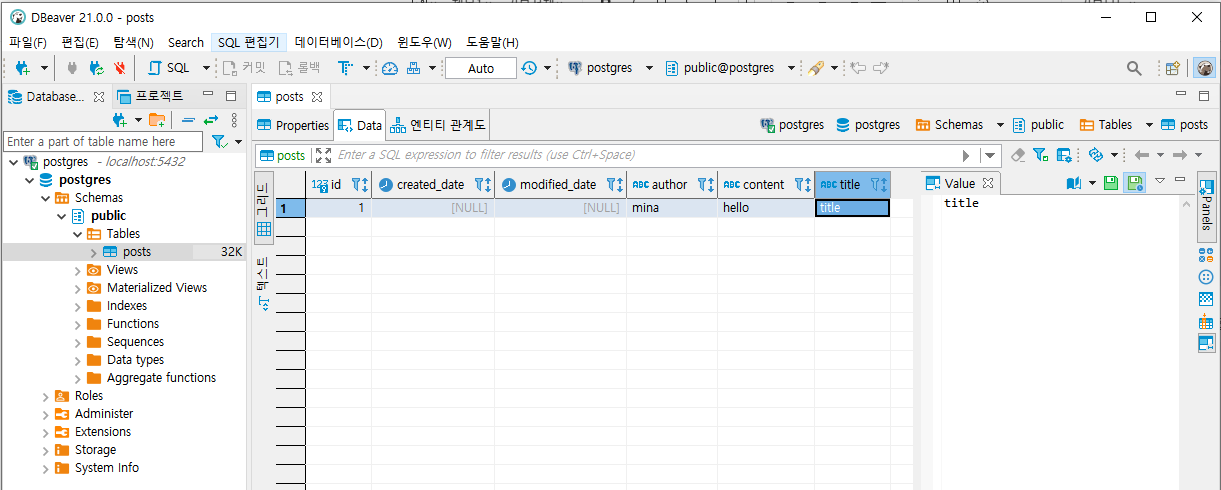
위와 같이 한눈에 알아보기 쉬운 UI이고 여러 DB 서버를 함께 관리할 수도 있어서 편리합니다.

Connection configuration은 위와 같이 Database에 맞는 정보로 세팅해주면 됩니다. 로컬 DB에 연결해본 적은 처음인데 잘 되어서 너무 좋은 것 같습니다!
Postgresql 설치부터 Gradle Project 설정 및 적용, DB 툴까지 정리해보았습니다. 평소처럼 에러를 정리하려다가 이런 방법으로 postgresql을 적용하고 싶은 분들이 편하게 볼 수 있는 가이드가 있으면 좋을 것 같아서 전체 절차를 정리했습니다. 잘못된 내용이나 개선할 사항이 있다면 댓글로 남겨주시면 감사하겠습니다:)
'프로그래밍 > Java' 카테고리의 다른 글
| [Java] 콜백(callback) 함수 (0) | 2020.08.10 |
|---|